Studio
-
Sculpting with Chavant NSP Clay
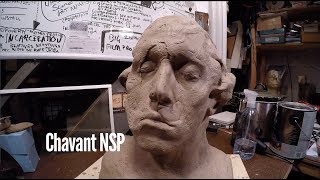
Here is an overview of how you can exploit the characteristics of NSP clay to work a little more quickly, and achieve some interesting results.
I want to share with you some techniques for working with non-sulfurated plasticine clay. It doesn't have sulfur. So "NSP," the S stands for sulfur. The whole idea is that you want to avoid sulfur being a part of your working process because it's a chemical that doesn't cooperate very well with silicone.
Section 1: Clay Press
One technique is making a clay press. A clay press is a process of taking a silicone negative and dumping some molten clay into a mold, and brushing it around. You can get all kinds of details out of the mold. Since it's kind of waxy, the thinner parts cool relatively quickly. You can keep dumping molten clay and building up thick layers of clay to get a thick clay wall. Don't use a good brush, by the way. Use one of those cheap $1 brushes that you get at the hardware store. They call them "chip brushes." You can sort of pile in a good portion of clay and then slush it around. This process is called a "slush mold." So you're sloshing around the material until it starts to cool and thicken, and then you'll have enough that's cooled so that you can pull it out of your mold. Then you'll have your clay press.
Section 2: Blocked in Sculpture
So what I've done here is I've sculpted together a couple of likenesses using this clay press idea - making a sculpture of this Janus idea. Janus is the Roman god that has two faces on either side of one head. Throughout this process, you'll notice that there's a lot of heating up of the clay and shaping it with heat. But once it cools, it carves well so that you can use a lot of carving tools. It's a good idea to put a sculpture on a lazy-susan. So you screw a lazy-susan into a base of some kind. Then you can turn your sculpture around really quickly.
Section 3: Lazy-Susan
A Lazy-Susan is a stand for making sculpture. It's a board that I found lying around. You can get these at the hardware store. You screw these to the bottom of the board, and it'll move around. It's a good idea to seal the end-grain with polyurethane or a product called "polycrylic." Polycrylic is a water-based sealer. Sealing the board will help to keep it from warping. You can see there's some slight warpage there. If the board warps after you attach the lazy-susan, then the thing could be misaligned, and the mechanisms could have some difficulty moving. Having one of these makes it very easy to transfer your sculpture around. It's also right after you have your sculpture on here, you can do some mold making. If your piece is on here and you're trying to make a mold of your sculpture, having this on a lazy Susan helps to rotate your sculpture, and it's a lot easier to work with. So it's very helpful.
Section 4: Structural Aspects of NSP Clay
Here is the part where I thought the neck wasn't looking so good. I tried to chop out a large portion of the neck. I realized that since I made the sculpture hollow that I created a large hole that I had to deal with. One of the advantages here was that since the clay can be built up structurally, you can build walls with it, and it'll retain its structure pretty well.
Section 5: Why Crosshatching?
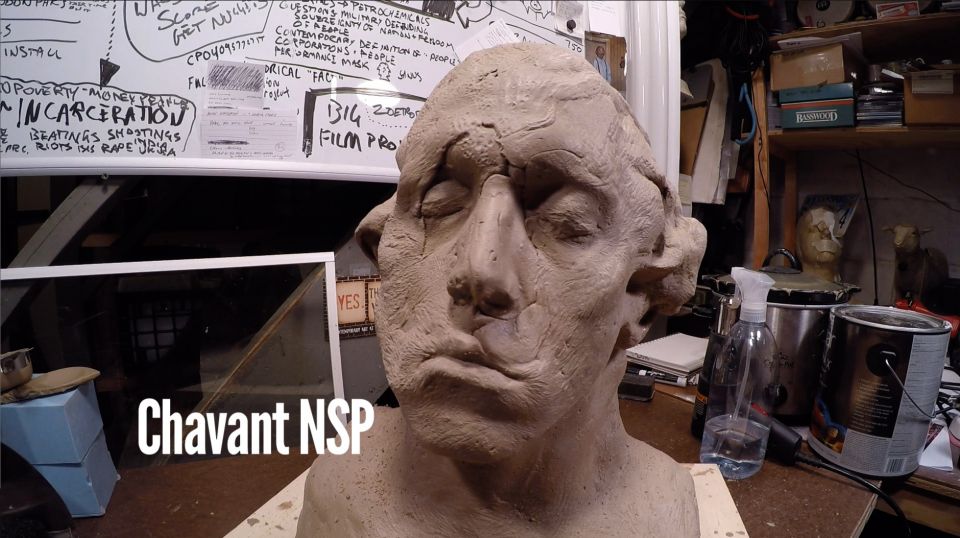
Right now, I'm raking down the sculpture to try and make everything a little bit more rounded looking in appearance. So, the best way to sculpt with this material is to sculpt everything to look like you shaved it down with the fork. Some people use forks to sculpt with this material. I have these finger covers that I bought from Amazon. I think you can also get them at Staples or any office supply store. When your sculpting with warm plasticine, you immediately have this rounded sort of scraped-over look. The whole point of scraping down the sculpture is that you're crosshatching as you go. Crosshatching is essential because you get more of a biological or a smoother look as you work your way up to the final details. There I was using a heat gun to melt down some areas that needed to be reworked. This clay works very well if you heat it. I have a toaster oven in the background, a microwave, and I'm also using a heat gun. So if I want to heat the clay quickly, I'll use the microwave. But then I also have a pile of clay going in a toaster oven on the warm setting. I'm always keeping it kind of warm because I want the ability to model on some clay to work with it immediately.
Section 6: Other Aspects
In a few spots, I'm starting to work in some detail. If a piece of clay has been sitting on the model for a while, it's cooled off, and I need it to be pliable again, then I'll take the heat gun, and I'll blast it with a heat gun. What's Happening here is I'm interested in changing the structure of the face. I wanted to give the sculpture a Quasimodo appearance. What that means is I wanted to take the eye socket and move it down a little bit. I wanted to get the sculpture's direction to sway a little bit from one side of the head to the next. I thought I would give it an eerie quality. What I did was I just cut out that part of the eye, and I wanted to see what would happen if I just moved it down. You can see that the beauty of this clay is that you can cut out a portion of the sculpture and then displace it a little bit and then resculpt it. It's an example of how versatile this material is. So I'm rotating it a little bit to give you an idea of how this can impact your design.
Section 7: Sculpture Tools
You'll notice that I use homemade tools. I'll make a lot of my tools. One of the tools that I make is made from scrub brushes and ballpoint pens. I took apart a ballpoint pen then I fill the empty spaces with bristles from a scrub brush. So you know, you go to the hardware store or wherever you are, and you might think, "that might make a good tool for this or a good tool for that," and that's how artists think, and that's how you get different results.
Section 8: Details and Texture
Here I'm showing you a little bit about heating the sculpture and then using that crazy wire brush to add some texture. I was interested in the Boris Karloff "mummy" makeup. I think Jack Pierce did that. The idea here is that I'm trying to give it sort of a crepe paper texture, and so I rough it a lot, and then I gradually start to make the wrinkles a little more defined with more and more subtle brushings of lighter and lighter brushes. Spraying with that denatured alcohol is helpful there. I added a hexagonal shape at the bottom. One of my ideas was that I thought I might make many castings of this sculpture and make sort of a Buckminster Fuller "buckyball" out of these castings. A "buckyball" is like a soccer ball. These are some of the ways I use this clay. You can research other sculptors that use this material. it's a great material, and you should check it out. It's called Chavant NSP.Post a question or comment.
Tom Estlack | Subscribe
 -
-
Search - Studio
Categories
Chronology
-
..............................